Operational Tips: Using the Open-Collector Outputs on Your Integrated X-ray Source: A Guide for Low and High Impedance Inputs
Introduction
This post serves as a comprehensive guide to help you connect the open-collector outputs on your Micro X-Ray integrated X-ray source to the inputs of your control components, while considering the 20mA maximum sinking current standard across Micro X-Ray integrated sources. By following these guidelines, you can ensure seamless integration and optimal performance of your integrated X-ray source. Additionally, we will explore how to connect and use a relay to drive low impedance and/or high voltage loads, expanding the capabilities of your integrated X-ray source.
Connecting Open-Collector Outputs to Your Control System
Regardless of whether your control system operates at 3.3V, 24V, or somewhere in between, the process of connecting the open-collector outputs from the integrated X-ray source is the same.
Understand Your Input Requirements
Determine the input specifications of your control system components that will receive the signals from the X-ray source module. Pay attention to the input voltage levels, any internal (built-in) pull-up resistors, and maximum current sourcing specification so you can determine if your input can be connected directly to the output, or if intermediary circuitry is required.
Identify Open-Collector Outputs
Review the X-ray source module’s documentation or datasheet to identify the available open-collector outputs and their corresponding pinouts.
Connect the Open-Collector Outputs
For circuits requiring less than 20mA and less than 24V
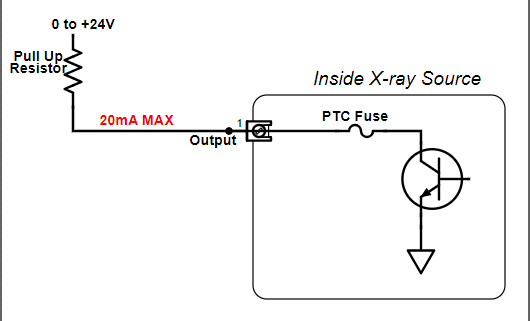
In the majority of cases, when feeding an open collector output into a digital input, a simple pull-up resistor is all that’s required in order to read the output, as shown in the figure below.
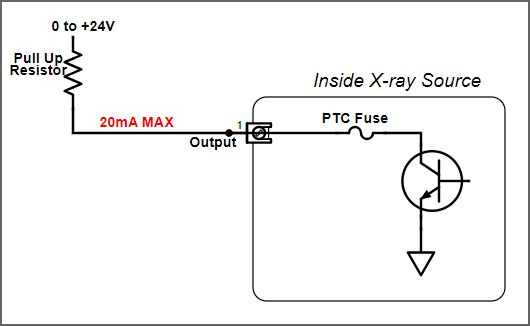
- Identify the positive voltage supply (up to 24V) and ground of your control system.
- Connect the open-collector output pin from the X-ray source module to the input pin of your control component.
- If your control component’s input does not have a built-in pull up resistor, you’ll need to add an external one:
- Connect a resistor between the positive voltage supply and the input pin of your control component.
- Ensure that the resistor value is appropriately chosen to limit the sinking current to a maximum of 20mA. Ohm’s Law (V=IR) can be used to calculate a suitable value for R with a little rearranging to solve for R=V/I, where V is your positive voltage supply, and I is the current you wish to sink, up to 20mA.
For circuits requiring more than 20mA and/or more than 24VDC
In situations where you need to drive a low impedance load or a load with higher voltage than what can be directly handled by the open-collector outputs, a relay can be employed, as shown in the figure below.
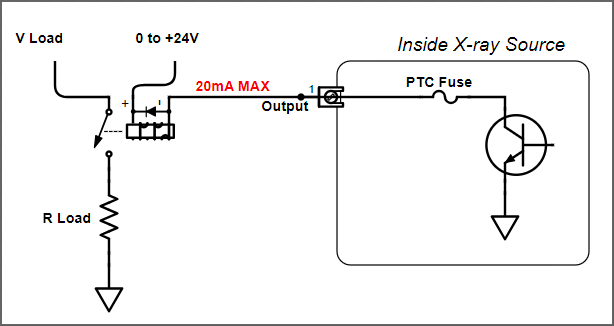
- Select a Suitable Relay
- Choose a relay that meets the specifications of your load requirements, such as the desired switching voltage, current capacity, and contact configuration.
- Ensure coil can be operated within the open-collector output specifications of up to 24VDC and less than 20mA sinking current.
- Connect the Relay Coil
- Connect one side of the relay coil to the open-collector output pin.
- Connect the other side of the coil to the positive supply voltage, ensuring proper polarity.
- Connect the Relay Contacts
- Connect one side of the load to the common terminal of the relay contacts.
- Connect the other side of the load to the appropriate contact terminal based on your desired switching behavior.
- Power Supply Considerations
- Ensure that the power supply for the relay coil and the load is appropriately rated.
- Use a separate power supply for the load if its voltage exceeds the rating of the open-collector output.
- Protection Measures
- Implement appropriate protective measures, such as diodes or snubber circuits, across the relay coil to suppress voltage spikes and protect the control circuitry.
Verify the Wiring
For either direct-driven or relay-driven operation, once the connections are made, double-check the wiring to ensure correct polarity and proper grounding. Incorrect connections can lead to malfunctioning or unreliable operation.
Signal Interpretation
In your control system software or firmware, you are now ready to interpret the X-ray source module’s open-collector outputs based on the specifications of your control components and the X-ray source manual. Design your control algorithms or logic accordingly to utilize these signals for the desired system behavior.
Conclusion
By following the steps outlined above, you can effectively connect and utilize the open-collector outputs from your integrated X-ray source module in your control system. Ensure that the sinking current at the output does not exceed the maximum specified limit of 20mA, and the voltage does not exceed 24V. With proper connections and signal processing, you can achieve seamless integration and optimal performance, enabling precise control of your X-ray source in various applications.
As always, if you have any questions about how to select or operate your X-ray source, please reach out today!
